- Home
- Lake Powell, Utah
- Broughton Islands
- Barkley Sound, Vancouver Island
- Blog: Barkley Sound, Vancouver Island
- Desolation Sound
- Blog: Desolation Sound, British Columbia
- Princess Louisa & Gulf Islands, British Columbia
- Blog: Princess Louisa & Gulf Islands, British Columbia
- Great Loop Part 1, Chicago to Mobile Bay
- Blog: The Great Loop, Part 1, 1600 miles of River Boating. Updated 11-6-10
- Getting Boarded & Inspected
- Boating With Boots, the cat
- Checklist & Instructions
- Living in the World of 12 Volts
- Making Use of Smaller Spaces
- Ah, the Head & Shower
- Trailering and Camping with the Tug
- Tools & Cleaning Materials
- Trailering & Insurance: When bad things happen
- The Last Chapter
- About Us
- Contact Us
Being Creative and Planning Ahead
Believe it or not, there is plenty of space on this boat for all the essential stuff that you need to boat for days, weeks or even months. But, the planning model must be different. We plan using the principle that everything can be re-stocked or renewed within 7 to 10 days. So, we bring clothes and food to meet that time period, plus emergency backup materials and supplies.
We have customized many of the spaces on the tug to suit our needs and our style of cruising. The photo on the left shows shelves mounted into the V-berth. Put on both sides, this holds all of our clothes and shoes for the trip, thus, we do not live out of a duffel bag. The photo on the right, shows how the galley spaces were used to hold the plates and cups.
We have customized many of the spaces on the tug to suit our needs and our style of cruising. The photo on the left shows shelves mounted into the V-berth. Put on both sides, this holds all of our clothes and shoes for the trip, thus, we do not live out of a duffel bag. The photo on the right, shows how the galley spaces were used to hold the plates and cups.
Dividing and Organizing
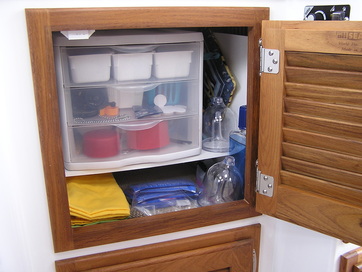
Ranger puts a ton of cabinet space on their boats. We divided up the cabinets with fixed shelves and mounted see-thru plastic drawer units in them. Things do not rattle around, the spaces are large enough to be use-able but small enough to easily and fully contain the contents.
A False Floor Creates More Accessible Spaces
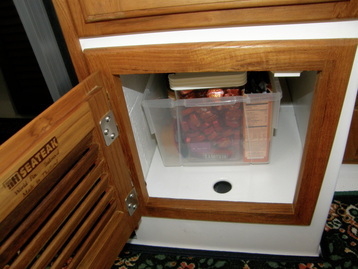
This cabinet is next to the refrigerator and it is deeper than the others because of the shape of the hull. This photo shows a clear container resting on a flat, white, floor; that is the false floor that was added. Under that panel, that just sits unsecured on two cleats, is about 4 inches of depth that is home to backup supplies of food and drink.
All of the white colored material used is Starboard or Seaboard, which is plastic like, sold in sheets, and is easily shaped by normal woodworking tools. We have used two thicknesses: mostly 3/8" and sometimes 1/2".
All of the white colored material used is Starboard or Seaboard, which is plastic like, sold in sheets, and is easily shaped by normal woodworking tools. We have used two thicknesses: mostly 3/8" and sometimes 1/2".
Making Space Where None Existed
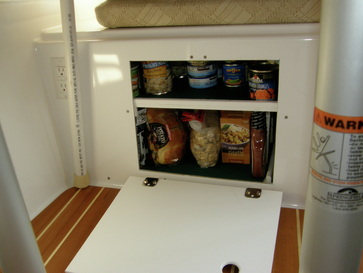
The cabinet under the passenger seat is used for the air conditioning unit, but in the Pacific Northwest, that is something we rarely need and the boats usually do not come equipped with it. We use this space by cutting into the wall, adding two shelves that are lined with non-skid material and then a door made of Starboard that is held in place with a stout magnet. This cabinet holds the lion's share of a 7 day supply of food.
Move the VHF Radio for Better Safety
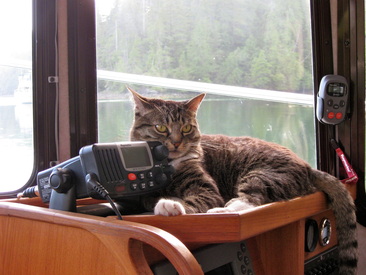
If you are going to be a boater, you must be comfortable and ready to use the VHF radio. We moved the radio from below the chart plotter to the location you see in the photo because it was a safety issue. The factory cannot locate it where I put it because, for very short people, it might block a portion of the view out of the front window. For us, the safety issue was being able to easily see the LCD screen on the radio. That screen will show emergency and routine data from boats when they use their MMSI number.
Moving the radio was very easily. Ours was held in place with silicone caulk. It was cut, the radio slid out, and the cables were long enough to move it.
The next addition was adding a remote speaker to the navigator's side of the cabin where they could hear the radio traffic just as well as the pilot.
The small remote control mounted on the side of the window is the Raymarine Sportpilot, an autopilot.
By the way, Boots is fine with the radio's location as you can see.
A Fold-Down Cockpit Table
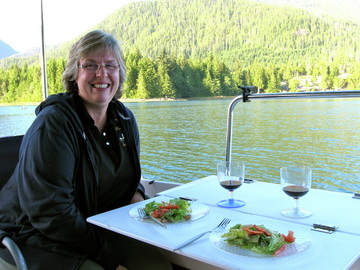
We get asked about this idea a lot. We took out the cushion because the height did not work for Laurie. Using 3/8" Starboard, we copied the top of the "bait well," added hinges and a triangle-shaped support that swivels out to take the weight. When put away, the top folds back and the support swivels back against the wall above the cabinet doors and is held in place with velcro.
We like folding director's chairs because these fit into the cockpit corner very nicely and are held in place with web straps that run through two anchoring points. Rubber caps are added to the chair's feet to better protect the cockpit's gelcoat.
We like folding director's chairs because these fit into the cockpit corner very nicely and are held in place with web straps that run through two anchoring points. Rubber caps are added to the chair's feet to better protect the cockpit's gelcoat.
Dinghies Are Like Opinions; Everyone Loves Theirs
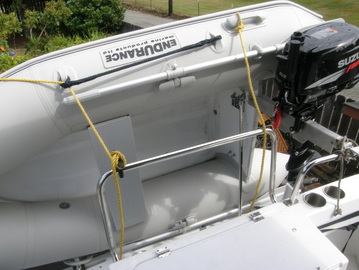
We have had several dinghies in our boating experience and we are really happy with this one. Our conditions were: no longer than the width of the boat because it should not hit the dock or the lock wall before the fenders do, light enough to be handled by two people and not add substantial weight to the boat, have a hard bottom to handle the rocks and shells of Pacific Northwest boating, be able to secure to the swim step with davits, will row adequately, and can handle the engine we wanted.
We settled on a rigid hull inflatable model from Endurance Marine. In this photo, you will see the motor rests on a stainless steel bracket that I designed and had fabricated. The motor stays fixed to it, being bolted to it, and the whole bracket swivels up or down as the dingy is raised or lowered. We do not have to muscle the motor around. We have just changed and downgraded the motor from a 6 HP to a 2 HP air cooled Honda that serves all of our needs quite nicely.
For freeway towing, additional lines are used to better secure the dinghy to the boat. On the water, the Laurie Ann will lose a knot or two from her top speed when the dinghy is with us because it is like a cup gathering wind as we go.
Make a Huge Reduction of Engine Noise
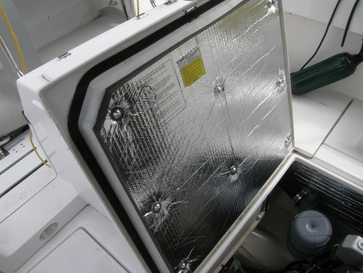
This noise dampening material is available at our local boating supply store and is foam, a lead sheet and foil exterior. It took about an hour to install using the contact cement and the anchor points that come with the sheet of material and the total cost was less than a $100.
But the reduction in engine noise coming into the cabin was dramatic. Now, there is no difference in engine noise when the cabin door is open or closed. It did add a small bit of weight to opening the engine hatch, but no big deal!
But the reduction in engine noise coming into the cabin was dramatic. Now, there is no difference in engine noise when the cabin door is open or closed. It did add a small bit of weight to opening the engine hatch, but no big deal!
Ideas For The Cave: Coats, Hats and PFD's
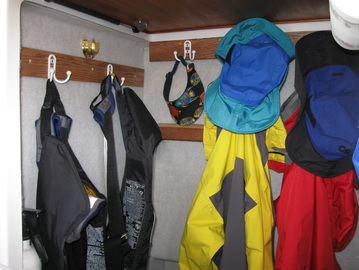
The hanging rod strategy of storage just did not work for us. With the coat hook strategy, the coats are not in the way when accessing the rest of the cave. To create this idea, the rod was removed and two strips of oak wood were screwed into the wall and corrosion resistant hooks were installed. Take a magnet to the hardware store, if the hook reacts to the magnet it will probably rust.
For Boots, her litter box goes in this corner. Perfect for us; perfect for her.
Sidebar: get the inflatable PFD's that will auto inflate and have the big D-rings in the front. They are more expensive but worth it.
For Boots, her litter box goes in this corner. Perfect for us; perfect for her.
Sidebar: get the inflatable PFD's that will auto inflate and have the big D-rings in the front. They are more expensive but worth it.
A Look At the Laurie Ann's Cave
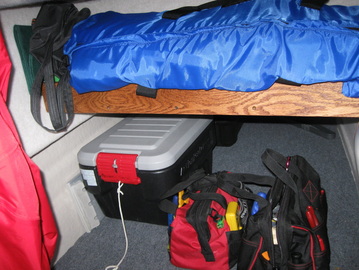
This the cave when the Laurie Ann is not loaded. The cushion is under our bed at home and replaced with indoor-outdoor carpet. The available floor space is often used for the equipment bag that holds our scuba dive gear.
A shelf was added that contains all the Laurie Ann's canvas and cockpit window screens. Having these up and out of the way has protected them from wear and tear and kept them close by and accessible.
Not shown in this photo is that above the blue bag and mounted to the wall is the Laurie Ann's Abandon Ship Bag. It has the items that we would need to survive and carry on if we had only three minutes to evacuate the boat. Nearby is the hand-held VHF radio.
A Platform for Scuba Diving
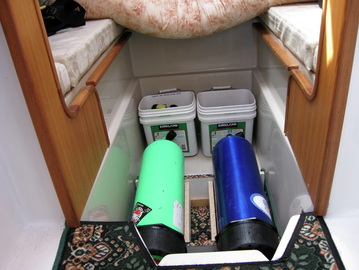
We keep the V-berth in bed-mode all the time and this provides an opportunity to use the center space for great storage. In our case, being scuba divers, this space can take four tanks, two buckets of weights, and two dry suit bags. We but the other gear in an equipment bag and slide it into the cave that is under the dinette table. This gear weighs about 200 pounds but when it is located here, the boat's trim and performance is not hardly affected.
Stabilizing the Dinette Table without sacrificing function
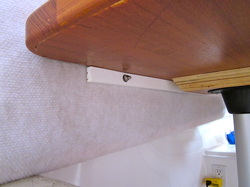
Over nearly five years and 800 engine hours, the dinette table was too unsteady for our tastes. The very easy fix was bolting a 1/2 thick strip of Starboard to the wall that acts as a cleat. The table still rests on the two legs but the cleat has taken out all the side to side motion. The table still easily slips off the legs to be another berth. Yes, you have to drill two holes through the cabin wall but it is water tight.
